
Introduction
This guide provides an end-to-end demonstration of a DVB-S2 encoding and transmission setup using a PlutoSDR and BATC PicoTuner. It is intended to serve as a reproducible example to help others successfully encode video, transmit it over RF, and receive it using standard amateur radio tools.
The guide is written for current and future members of the Open Research Institute (ORI), as well as amateur radio operators and digital communications enthusiasts interested in experimenting with DVB-S2 transmission systems. It is especially useful for those looking to put the DVB-S2 encoder into practical use in laboratory or field environments.
This demonstration shows how to take a video file, encode it into a transport stream, and transmit it using a PlutoSDR configured with a ORI's DVB-S2 encoder. The RF signal is delivered via coaxial cable to a BATC PicoTuner receiver, which decodes and displays the video on a connected monitor.
The full demo setup includes:
- A computer (for encoding, interfacing, and debugging)
- A PlutoSDR (serving as the DVB-S2 transmitter)
- A BATC PicoTuner (as the receiver and decoder)
My initial motivation for this demonstration was to replicate F5OEO’s implementation of the DVB-S2 encoder on the PlutoSDR and validate its performance using a known working receiver. Once this baseline is confirmed, the goal is to port the encoder design to additional hardware platforms using OpenCPI.
System Overview
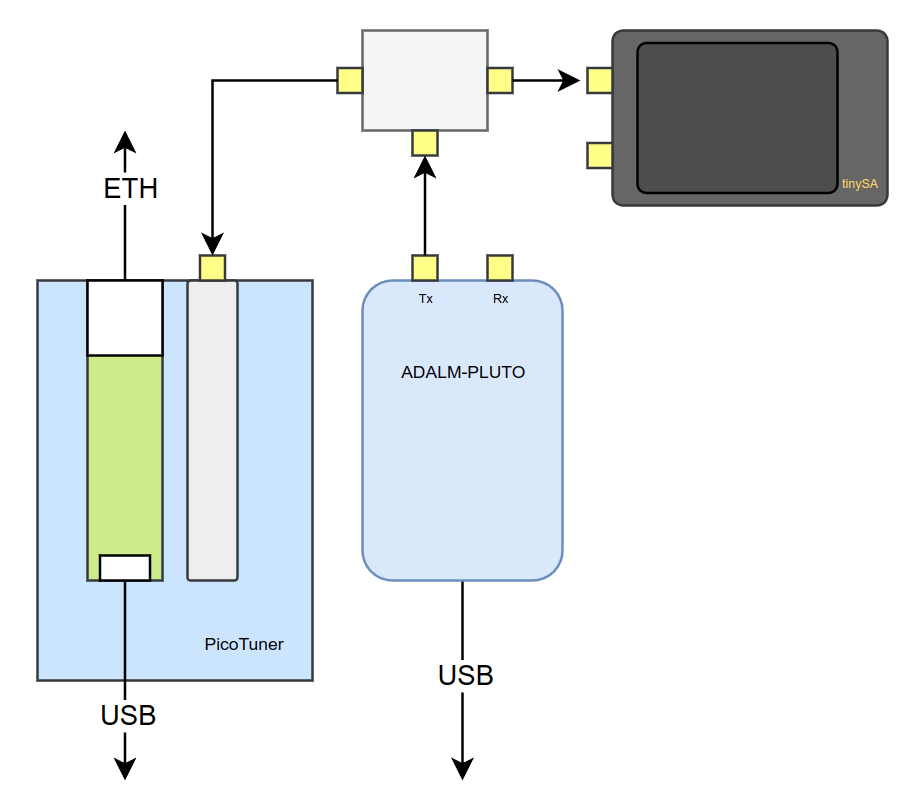
The demonstration system consists of a host computer, a PlutoSDR running custom firmware, a BATC PicoTuner configured in Ethernet mode, and a spectrum analyzer connected via an RF splitter for signal observation. The RF signal is looped directly between the PlutoSDR transmitter and PicoTuner receiver using coaxial cables for a clean lab setup.
Signal Flow
- The host computer streams a transport stream (TS) video using
ffmpegto the PlutoSDR. - The PlutoSDR modulates and transmits the DVB-S2 signal over RF.
- An RF splitter sends the signal simultaneously to the BATC PicoTuner (for decoding) and a TinySA spectrum analyzer (for real-time monitoring).
- The PicoTuner decodes the signal and outputs video via a monitor or media player.
Requirements
Hardware
- Host Computer: x86-64 Linux system for interfacing and control
- PlutoSDR: ADALM-PLUTO with F5OEO firmware for DVB-S2 transmission
- BATC PicoTuner: In Ethernet mode, used as the DVB-S2 receiver
- RF Splitter: Passive splitter for feeding both PicoTuner and spectrum analyzer
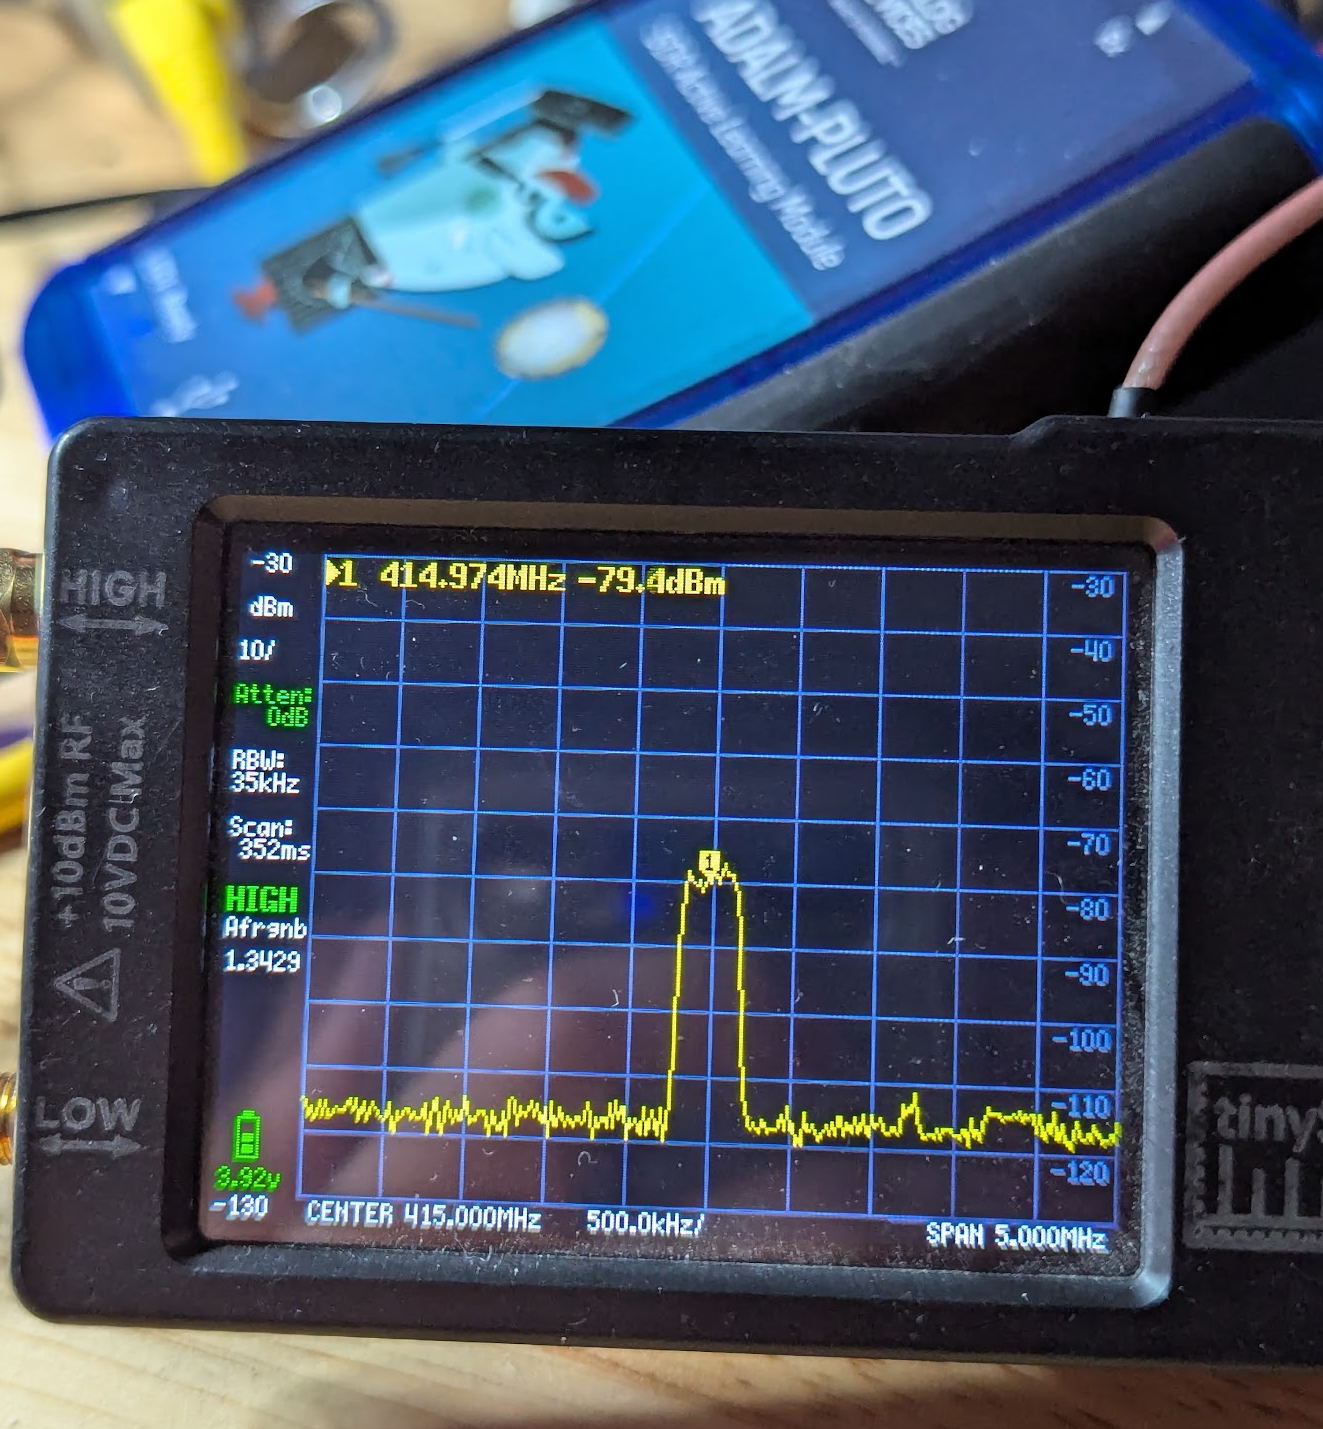
- Spectrum Analyzer: TinySA or equivalent, optional but useful for signal verification
- Coaxial Cables: SMA cables to connect TX → splitter → RX
Software
ffmpeg: Used to encode and stream transport stream video to the PlutoSDRffplay: Simple tool to view decoded video output from PicoTunerminicom: For serial monitoring of the PicoTunermosquitto-clients: Command-line MQTT tools for interaction with the receiverMQTT Explorer: GUI tool for visual monitoring of MQTT messages from the PicoTuner
Setup Instructions
Transmit
The transmit firmware used in this demonstration is built by F5OEO, across two repositories:
- pluto-ori-ps – Processing system code
- pluto-ori-frm – Full firmware image
Prebuilt firmware artifacts are available from: Google Drive Link
To install the firmware:
- Copy the
.frmfile to the mass storage device enumerated when the PlutoSDR is connected via USB. - Safely eject the device and wait for it to reboot with the new firmware.
Configuring the PlutoSDR
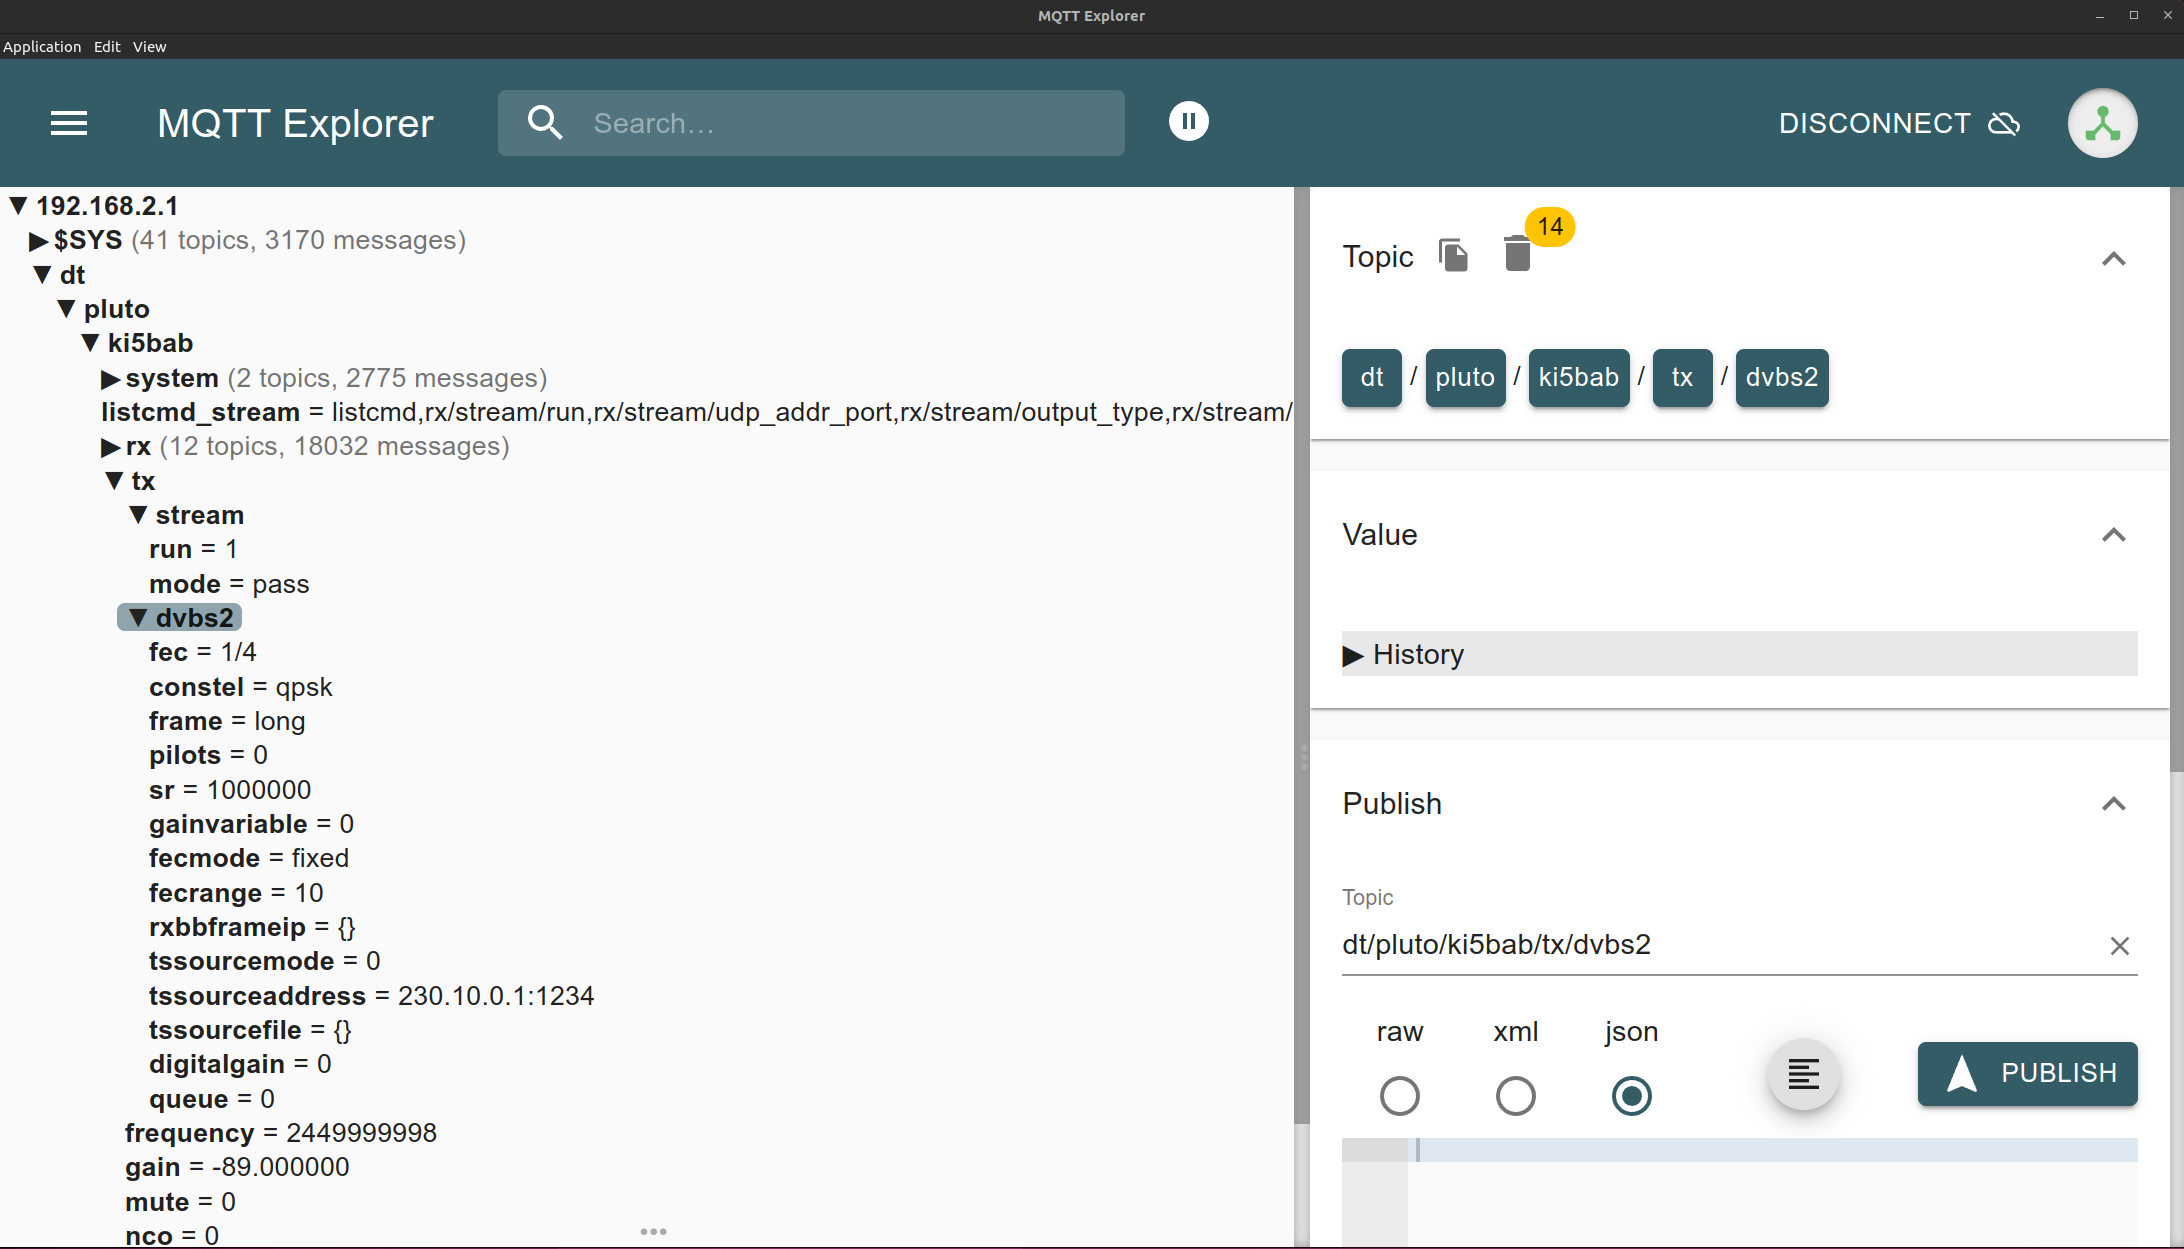
Configuration is done over MQTT. On your host machine (Ubuntu 22.04 in this example):
sudo snap install mqtt-explorer
sudo apt install mqtt-clients
Set the transmitter call sign on the PlutoSDR:
mosquitto_pub -h 192.168.2.1 -t cmd/pluto/call -m yourcall
Open MQTT Explorer and connect to the PlutoSDR at 192.168.2.1. You’ll see various topics; explore tx, stream, and dvbs2 to monitor system status.
Transmitter Initialization Script
Use the following script to initialize the DVB-S2 transmitter:
#!/bin/bash
MQTT_BIN=mosquitto_pub
MQTT_HOST=192.168.2.1
MQTT_PREFIX=cmd/pluto/ki5bab

$MQTT_BIN -h $MQTT_HOST -t $MQTT_PREFIX/tx/gain -m -40
$MQTT_BIN -h $MQTT_HOST -t $MQTT_PREFIX/tx/mute -m 0
$MQTT_BIN -h $MQTT_HOST -t $MQTT_PREFIX/tx/frequency -m 415000000
$MQTT_BIN -h $MQTT_HOST -t $MQTT_PREFIX/tx/dvbs2/sr -m 333000
$MQTT_BIN -h $MQTT_HOST -t $MQTT_PREFIX/tx/nco -m 0
$MQTT_BIN -h $MQTT_HOST -t $MQTT_PREFIX/tx/stream/mode -m dvbs2-ts
$MQTT_BIN -h $MQTT_HOST -t $MQTT_PREFIX/tx/dvbs2/fec -m 5/6
$MQTT_BIN -h $MQTT_HOST -t $MQTT_PREFIX/tx/dvbs2/constel -m qpsk
$MQTT_BIN -h $MQTT_HOST -t $MQTT_PREFIX/tx/dvbs2/pilots -m 0
$MQTT_BIN -h $MQTT_HOST -t $MQTT_PREFIX/tx/dvbs2/frame -m long
$MQTT_BIN -h $MQTT_HOST -t $MQTT_PREFIX/tx/dvbs2/fecmode -m fixed
$MQTT_BIN -h $MQTT_HOST -t $MQTT_PREFIX/tx/dvbs2/agcgain -m -100
This script:
- Sets gain and unmutes the RF
- Defines frequency, symbol rate, and offset
- Enables DVB-S2 transport stream mode
- Configures modulation, FEC, frame type, and AGC
After running the script, you should see a signal on your spectrum analyzer. At this stage, null transport stream packets are being transmitted and can be decoded.
Receive
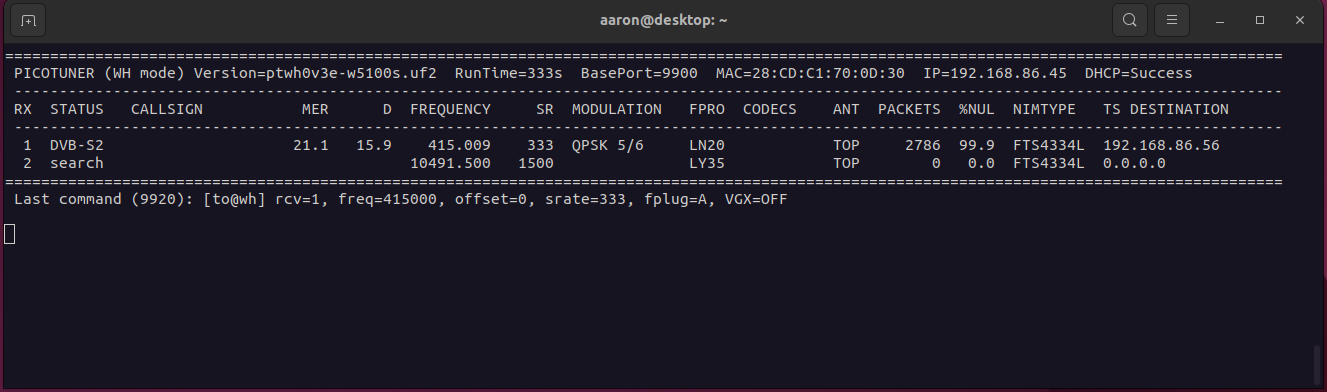
The receiver used in this demo is the BATC PicoTuner, a successor to the MiniTiouner. The key difference lies in the transport stream interface: the PicoTuner supports both USB and Ethernet. This guide uses Ethernet mode, which offers more robust standalone functionality.
The PicoTuner features two Serit DVB-S2 ASIC tuners capable of tuning and demodulating DVB-S2 signals. Although attempts were made to reproduce Dr. Esteves' GSE data reception with this receiver, success was limited due to implementation differences.
Notably, the PicoTuner is not suitable for the target 10 MSPS symbol rate due to limitations in its design. Although the MiniTiouner is now end-of-life, I have acquired a PCB and plan to revisit this in the future.
Receiver Setup
- Connect the PicoTuner to your network via Ethernet (DHCP will assign it an IP address).
- Connect via serial console to read debug info and IP assignment.
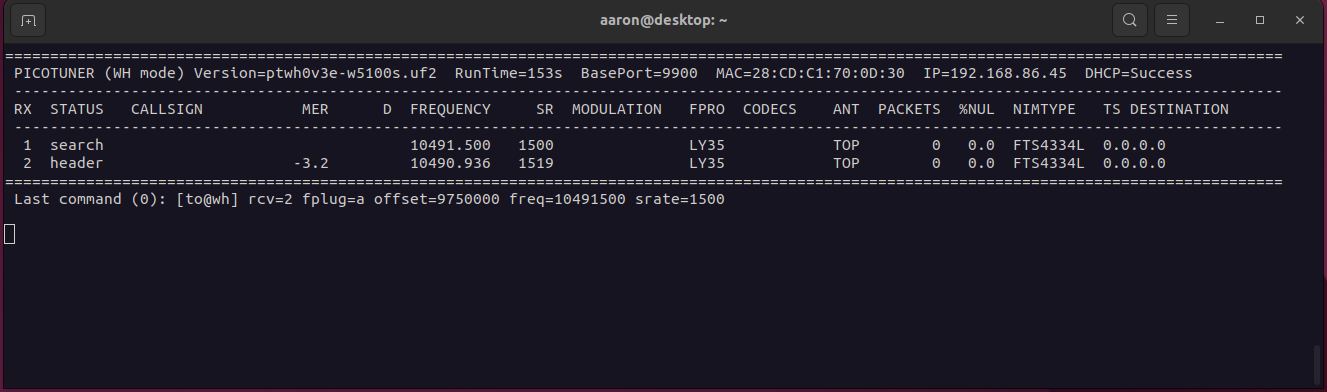
- Once IP is known, configure the receiver using
netcat:
echo "[to@wh] rcv=1, freq=415000, offset=0, srate=333, fplug=A, VGX=OFF" | netcat -uw1 192.168.86.45 9920
This configures:
- Frequency
- Offset
- Symbol rate
- Front-end plug
Monitor the serial output to verify lock and null packet rate (lower NULL = higher usable data).
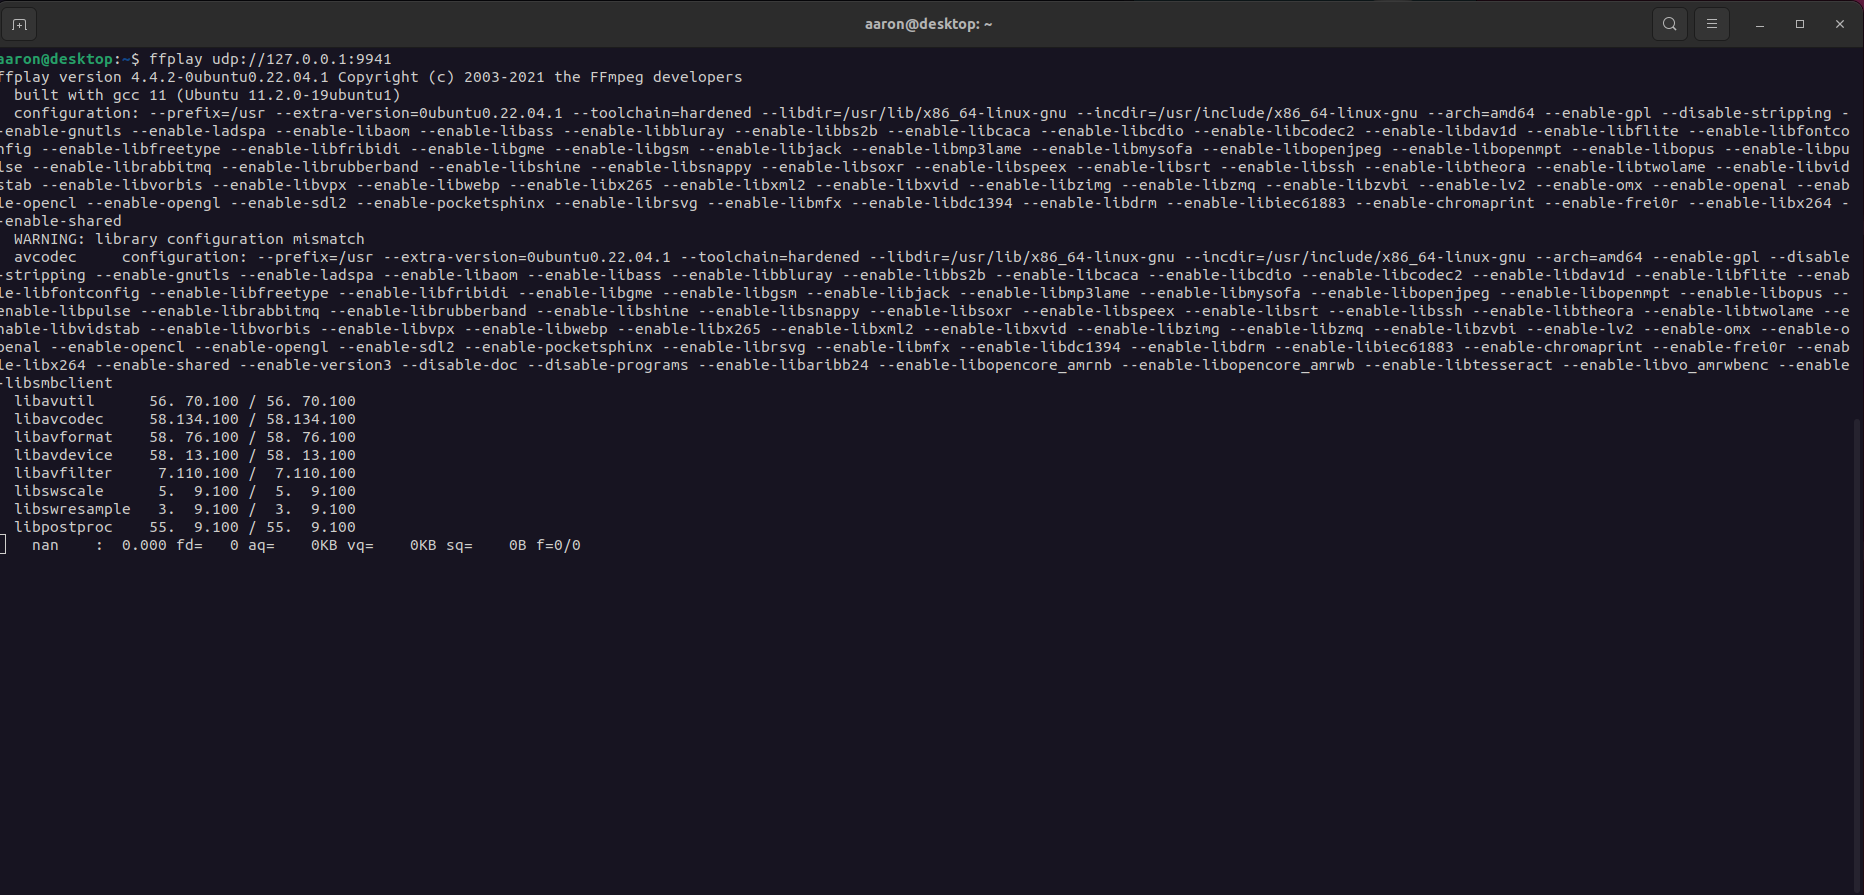
Playing the Stream
In a terminal:
ffplay udp://127.0.0.1:9941
This begins playback of the transport stream received by the PicoTuner.
Sending Video to PlutoSDR
Use ffmpeg to send a test video over the network to the PlutoSDR:
ffmpeg -i time_lapse_build2.mp4 \
  -c:v libx264 -x264-params "nal-hrd=cbr" \
  -b:v 333k -minrate 333k -maxrate 333k -bufsize 4M \
  -f mpegts "udp://230.10.0.1:1234?localaddr=192.168.2.10&pkt_size=1316&bitrate=333000"
It takes a little bit of time for the packets to buffer and transmit but once the stream gets going ffplay should display the video you are sending. I haven't spent much time tweaking the image quality settings but the objective was to get data to flow through.
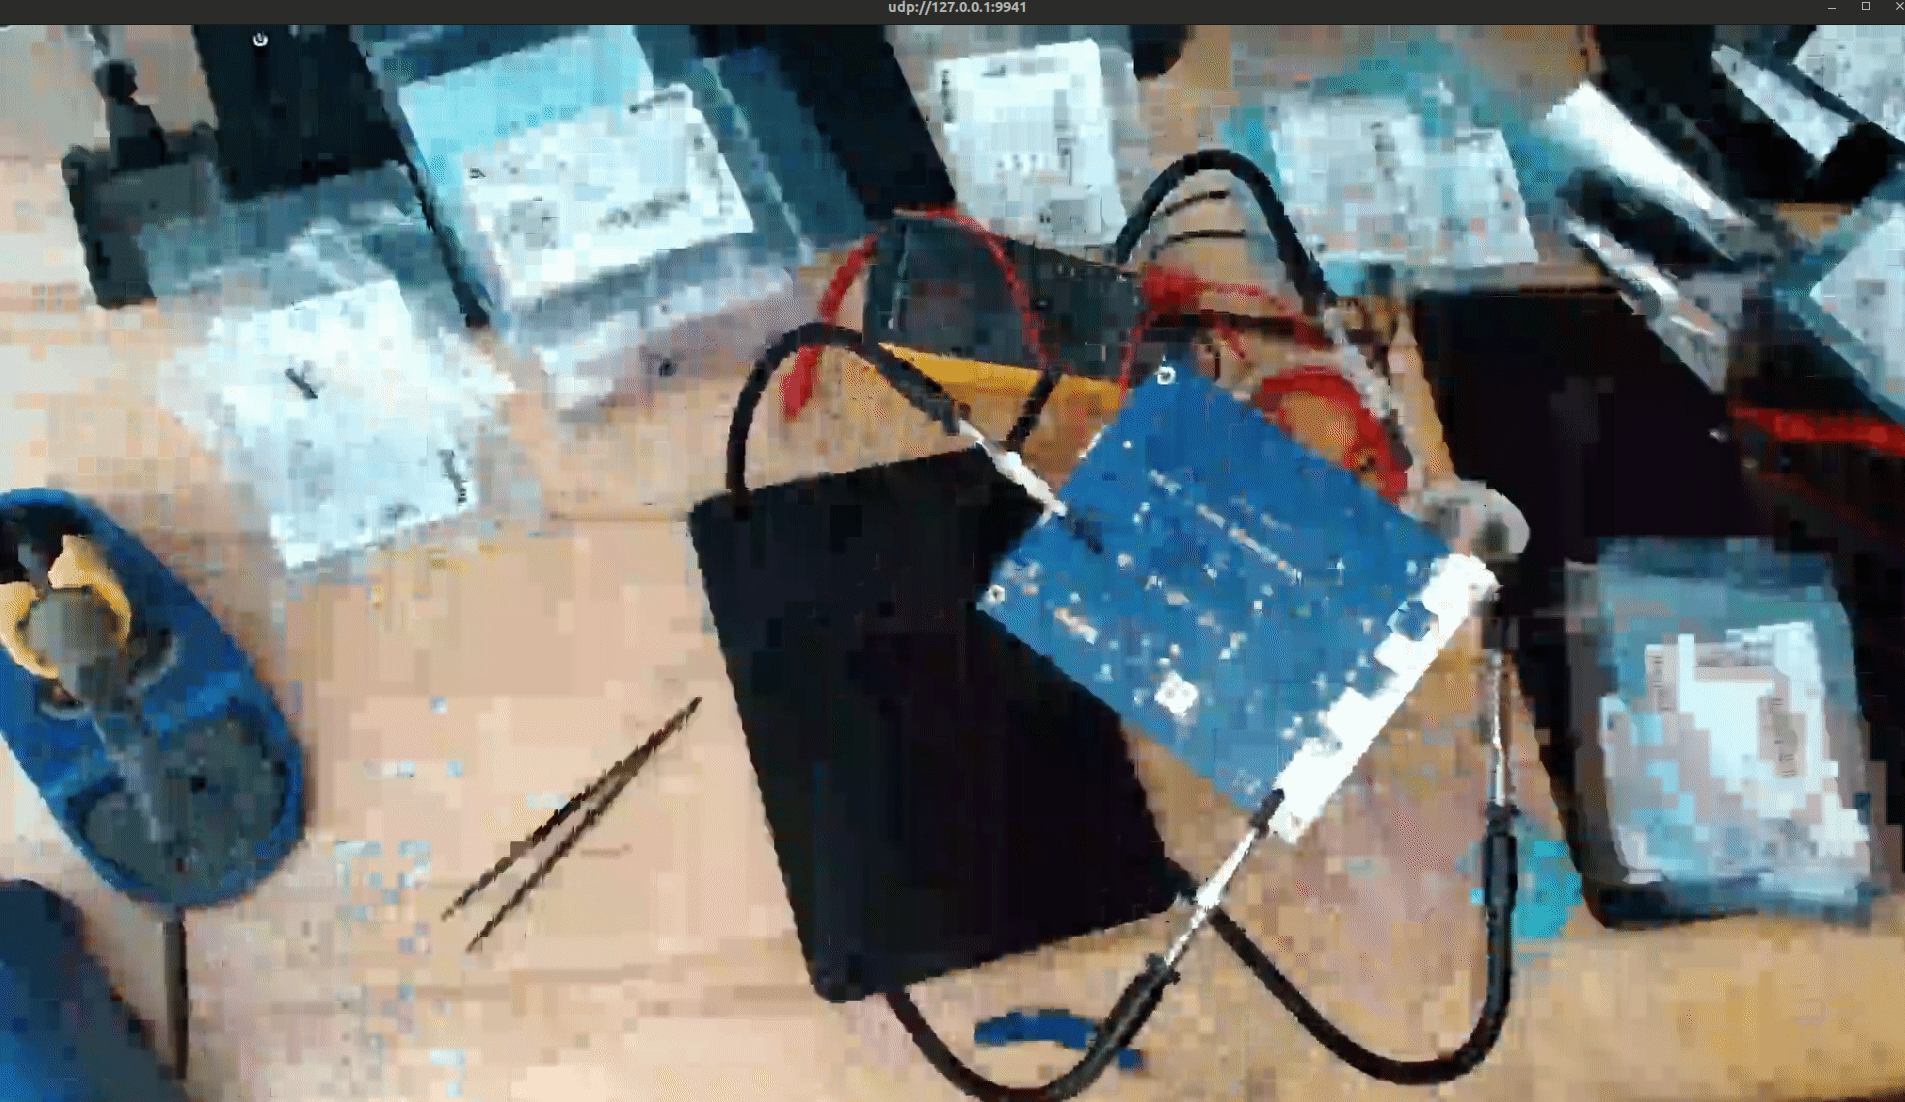
This completes the transmit-receive loop with video. You should see the stream displayed on your monitor via the PicoTuner.
Future Enhancements and Next Steps
This demonstration serves as a foundation for further development within ORI's DVB-S2 and geostationary payload efforts. Planned future work includes:
- Integration into OpenCPI:
Port the DVB-S2 encoder into the OpenCPI framework to enable reuse across multiple platforms and improve modularity, maintainability, and hardware abstraction. - Testing on FPGA Development Boards:
Deploy and validate the encoder design on Xilinx Zynq platforms such as the ZC706 and ZCU102 to prepare for more capable, radiation-tolerant hardware in space applications. - Revalidation Using MiniTiouner Receiver:
Perform cross-validation of the DVB-S2 signal using the popular MiniTiouner receiver to confirm compatibility across multiple demodulation platforms. - GSE Testing and Guide Creation:
Extend the demonstration to test Generic Stream Encapsulation (GSE) functionality over DVB-S2 and produce a separate technical guide dedicated to GSE-specific setup, tools, and debugging.